Apple Pay
General information
Apple Pay is a digital wallet provided by Apple that enables customers to make payments on websites and through iOS mobile applications without the need to enter full payment data each time.
There are two ways to integrate Apple Pay:
- Tranzzo hosted integration (the Apple Pay payment button is located on our payment page).
- Integration with the Apple Pay API (placing an Apple Pay payment button on your site).
Before starting the integration process, you should:
- Register in the merchant portal.
- Read the list of acceptable products.
- Ensure that your website uses HTTPS and supports TLS.
Tranzzo hosted integration
You can easily add Apple Pay as a payment method to your website or mobile application with Tranzzo's hosted integration. You don't need to make any additional settings as the Apple Pay payment button will be displayed on our payment page. Contact Tranzzo support to add this payment method.
When using hosted checkout in iframe mode or a payment widget, for security reasons, the Apple Pay method is only supported on devices with Safari version 17 or higher.
Integration using hosted checkout or a payment widget allows initiating payments via Apple Pay from browsers other than Safari, Mobile Safari, WebKit, and others built on it, as well as from devices running operating systems other than macOS and iOS.
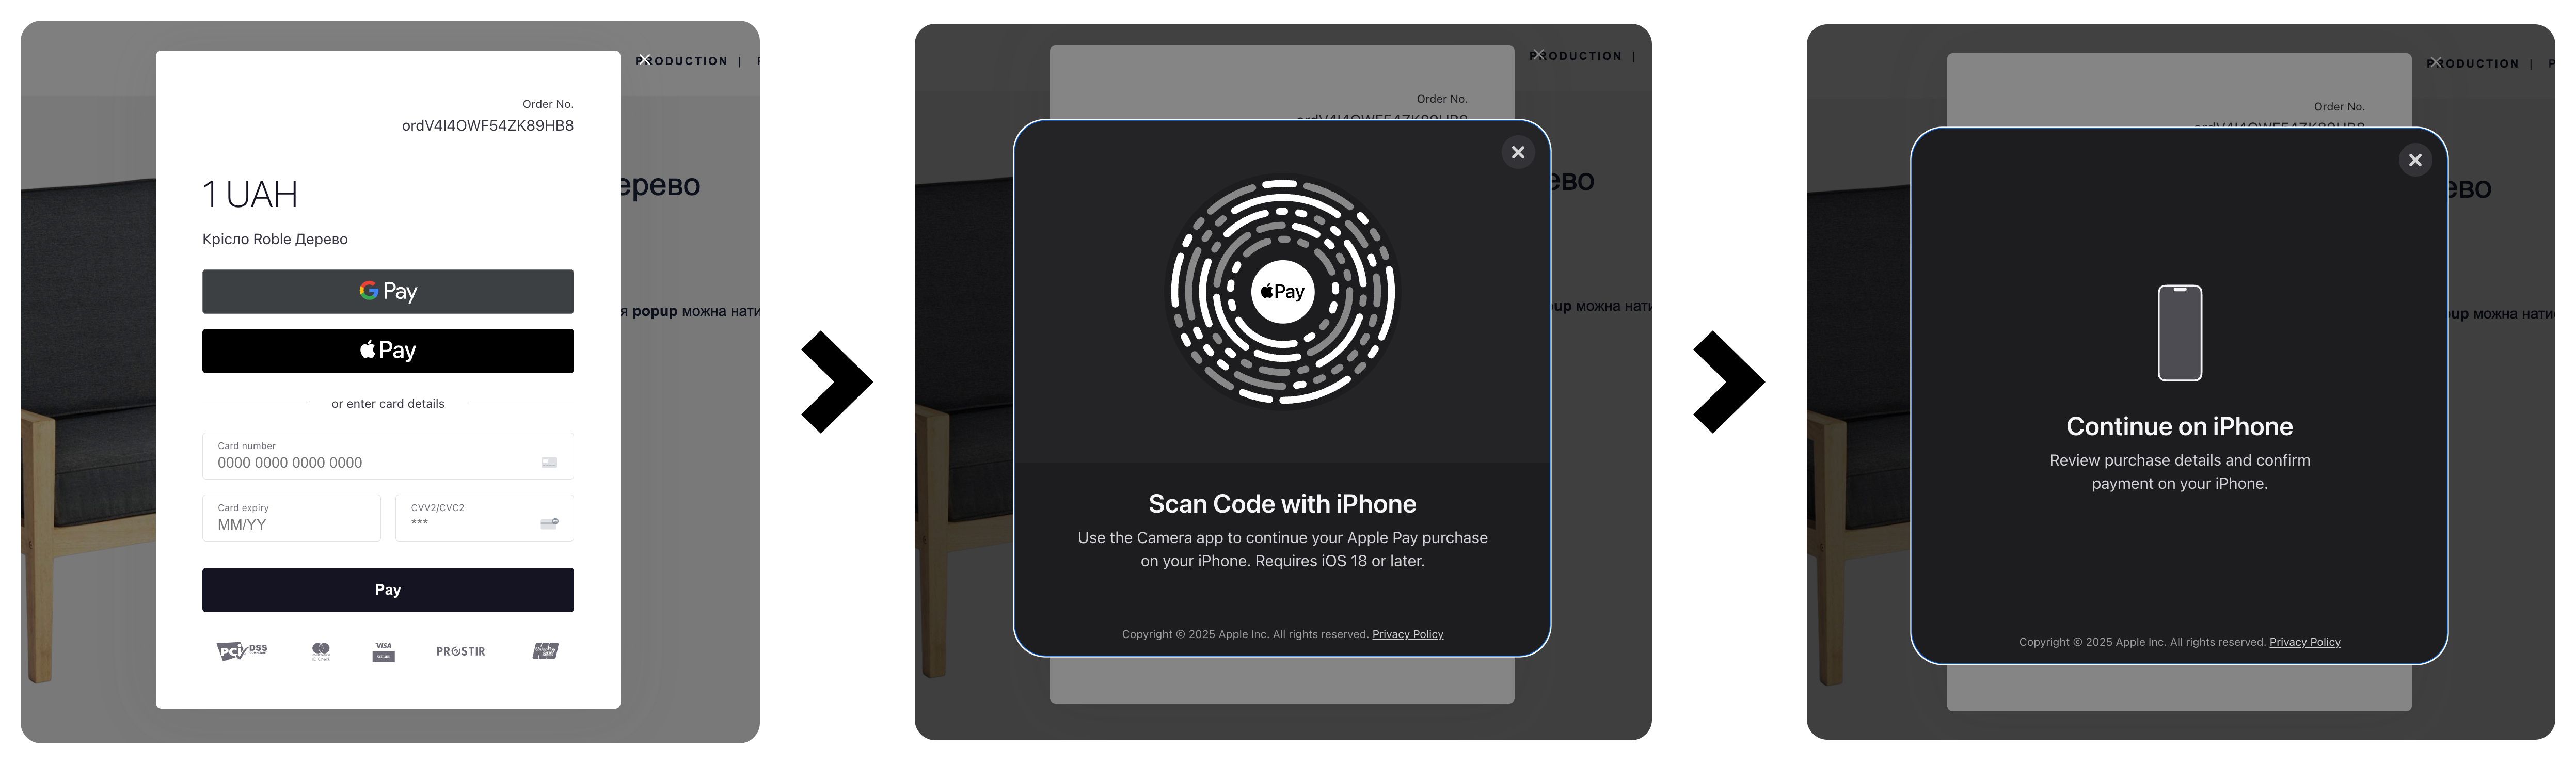
Payment process when checkout/payment widget is opened from a desktop device:
- The user clicks the Apple Pay button.
- A modal window with a QR code from Apple opens on the payment page.
- The user scans the QR code using an Apple mobile device and completes the payment on it.
- The payment processing result is displayed on the page.
The payment process when the checkout/payment widget is opened from an Apple mobile device works similarly to how it functions in the Safari browser (without the need to scan a QR code).
QR code-based payment is available on mobile devices running iOS version 18 or later. On Android devices, this functionality is not supported, and the Apple Pay button is not displayed.
When the hosted checkout is loaded or the payment widget is initialized, the system checks whether Apple Pay is supported on the customer’s device. If the Apple Pay SDK indicates that the method is not supported, the Apple Pay button in the checkout/payment widget will be inactive, and a message will be displayed next to it stating that the method cannot be used on this device.

Integration with Apple Pay API
To add Apple Pay as a payment method to your website or mobile app through Apple Pay API, you need to follow these steps:
- Create an Apple developer account associated with the Apple Developer Program or Apple Developer Enterprise Program.
- Obtain a personal merchant ID from Apple.
- Read and comply with Apple's Branding Guidelines for setup.
To complete the integration, follow these steps:
Step 1: Creating a Merchant ID
- Sign in to your Apple developer account.
- Proceed to the “Certificates, Identifiers & Profiles” tab.
- In the "Identifiers" section, select "Merchant ID".
- Click the "+" button in the top right corner to add a new merchant ID.
- Fill in the required fields and click "Continue".
- Click "Register" to confirm your details.
Step 2. Creating a merchant certificate:
- From the “Certificates, Identifiers & Profiles” tab, select an identifier in the sidebar, then choose a merchant identifier from the pop-up menu at the top right.
- Select your merchant ID.
- In the "Merchant Identity Certificate" section for Apple Pay, click "Create Certificate".
- Create a certificate signing request on your device, and then click "Continue".
- Click "Choose file".
- Select the certificate file with the .certSigningRequest extension in the dialog box that appears.
- Click "Continue".
- Click "Download".
- The certificate file with the ".cer" extension will be saved in the "Downloads" folder.
Step 3. Creating a merchant domain (optional):
This step is only necessary if you want to use Apple Pay on your website.
- Sign in to your Apple developer account.
- Go to the “Certificates, Identifiers & Profiles” tab and select an identifier in the sidebar, then select a merchant identifier from the pop-up menu at the top right.
- Choose your merchant ID.
- In the “Merchant Domains” section, click “Add Domain”.
- Enter the full domain name and click “Save”.
- Click “Download” to get the domain verification file and place it in the specified location and click “Verify” to confirm the domain ownership.
- Click “Done” to complete the process.
Step 4. Verifying the merchant domain
- Sign in to your Apple developer account.
- Under the “Certificates, Identifiers & Profiles” section select an identifier in the sidebar, then select a merchant identifier from the pop-up menu at the top right.
- Choose your merchant ID.
- In the "Merchant Domains" section, click "Verify" next to the domain you added in Step 3 and follow the further instructions to complete the verification process.
To use Apple Pay on your website, make sure your server meets the requirements specified in the Apple Developer Portal.
Integration of Apple Pay on a website
- Familiarize yourself with the instructions and features of the Apple Pay payment method.
- Ensure that your device or browser is compatible with Apple Pay.
- Configure the payment request structure.
- Complete merchant validation.
- Initiate a payment session and process the payment.
- Send the payment data to the Tranzzo API (refer to the next section "Charging").
Charging:
To charge a payment card stored in Apple Pay, include the following values in the direct method request for the payway and cc_token parameters:
payway: applepaymode: directcc_token: applepay:${base64_applepay_encrypted_token}
Request example:
curl -X POST \
  https://cpay.tranzzo.com/api/v1/payment \
  -H 'Content-Type: application/json' \
  -H 'X-API-AUTH: CPAY-HMAC-SHA256 ${API_KEY}:${SIGNATURE}' \
  -H 'X-API-Key: <ENDPOINTS_KEY>' \
  -d '{
  "pos_id": "<POS_ID>",
  "mode": "direct",
  "method": "purchase",
  "amount": 1,
  "currency": "UAH",
  "order_3ds_bypass": "supported",
  "cc_token": "applepay:123",
  "products":[],
  "customer_email": "[email protected]",
  "description": "Pay with Apple Pay Token",
  "order_id": "1234567890",
  "server_url": "https://callback.blackhole.com/callback",
  "result_url": "https://example.com/result"
 }'
After the initial request is made, the payment processing follows the standard procedures that are inherent in direct-integration.
Handle decryption on your side
If you are PCI DSS-compliant, you can decrypt Apple Pay tokens on your side.
Detailed steps for decrypting an Apple Pay token are described on the Apple Developer portal
Ensure you validate the Apple Pay certificate before attempting token decryption.
A payment request with a decrypted token should include the object's cryptogram and eciIndicator.
eciIndicator
EciIndicator — the Electronic Commerce Indicator that shows the level of electronic authentication/security for a transaction (for example, whether the payment passed through 3DS).
Returned by the payment system in a token. This parameter is optional.
If provided, include it in the authorization request.
Example:
05 - not authenticated (low assurance)
07 - authenticated (3DS) (higher assurance)
Request example:
curl -X POST \
  https://cpay.tranzzo.com/api/v1/payment \
  -H 'Content-Type: application/json' \
  -H 'X-API-AUTH: CPAY-HMAC-SHA256 ${API_KEY}:${SIGNATURE}' \
  -H 'X-API-Key: <ENDPOINTS_KEY>' \
  --data-raw '{
    "pos_id": "<POS_ID>",
    "mode": "direct",
    "method": "purchase",
    "amount": 1,
    "currency": "UAH",
    "order_3ds_bypass": "supported",
    "cc_number": "424242******4242",
    "exp_month": 12,
    "exp_year": 25,
    "cryptogram": {
      "type": "applepay",
      "cryptogram": "A1B2C3D4E5F6078901234567890ABCDEF",
      "eci": "05"
    },
    "products": [],
    "customer_email": "[email protected]",
    "description": "Pay with Apple Pay Token",
    "order_id": "1234567890",
    "server_url": "https://callback.blackhole.com/callback",
    "result_url": "https://example.com/result"
  }'